Showing posts with label Seche Vite. Show all posts

Tuesday, January 8, 2013

OPI Stay The Night

Hello lovely ladies!! I hope everyone's has a good start into 2013!!  I appologize for the short break I took from That One Nail Blog, and pretty much nails in general!  But now I'm back and I have alot of exciting things in store for you guys- including my own indie polishes!!  I'm hoping to open my store in less then two weeks!!

Anyways- on to today's post!  I'm super super excited about this post because I get to show you a Liquid Sand polish from OPI's newest collection, the Mariah Carey collection!!  OPI Stay The Night starts out as a black jelly-like base when wet with red glitters, but dries into a gritty, matte, "sandy" black- which makes the red just POP.  I bought a few other Liquid Sand Polishes, but Stay The Night was the one I had wanted to try most!!

Despite the look of Stay The Night when it's dry- it was actually surprisingly easy to apply!  It went on nice and smooth in 3 easy coats and dried very quickly!  After my mani was totally dry, I assumed it was going to be really, really gritty.  But it actually wasn't too bad.  Of course, I had to see what it looked like with a top coat, so after adding 1 coat of Seche Vite I think it actually felt more gritty then before the top coat- weird :/  

All in all, I really liked this polish and the idea of a "liquid sand" polish.  Here is Stay The Night prior to top coat:
Direct sunlight
Indirect sunlight
Indirect sunlight 
Direct sunlight

And here is Stay The Night WITH top coat:  (It was actually much harder to capture the amazing color of this polish with a top coat on)
Direct sunlight

Indirect sunlight

Indirect sunlight

Direct sunlight


And there you have it!!  The gorgeous "Liquid Sand" by OPI!!  Do you have any of the Liquid Sand polishes?  What do you think of them??  Let me know in the comments below!!  And until next time- happy polishing!  


Friday, December 7, 2012

Revlon Royal Jelly Sandwich

Hello everyone! I hope everyone's weekend is off to a good start!! I'm super excited for this post because 1.) you get to see the first picture I've taken with my light box and 2.) I get to show you my first ever jelly sandwich!!!

Soo.. Here we go!! I've seen jelly sandwiches forever now but I had yet to attempt one until yesterday!! I have no idea why because I loved the look of them. And then I loved it even more when I did my own!! Why hadn't I done a jelly sandwich before?!?

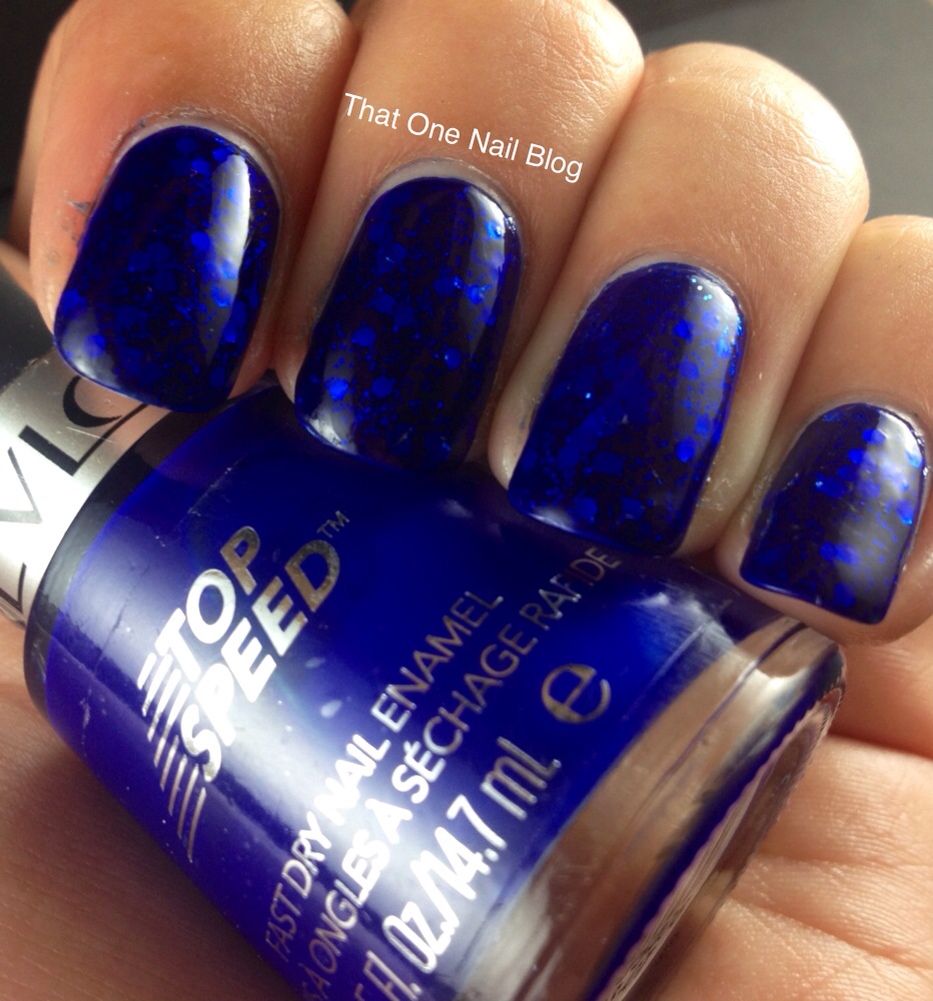
I used two coats of Revlon Royal, an amazing blue jelly, one coat of a nameless silver glitter from Forever 21, one more coat of Royal over the glitter and of course, a top coat of Seche Vite!! I love love loveee this so much!! It was soo simple and easy but it looks gorgeous!! I don't know if it would be the same with another polish or if it's just because of Royal, but it looks kind of deep, like the ocean or something..


Okay, enough about what I think... What do you guys think? Have you done a jelly sandwich mani before? What polishes did you use? Let me know in the comments below!!

Tuesday, December 4, 2012

Milani Rapid Cherry & Spoiled

Hello ladies! Today I have a relatively short post for you. I picked up two new polishes the other night that I wanted to show you. Enjoy :)

I used Milani Rapid Cherry as my base color. I bought this polish because I was looking for a nice, thicker red creme for my upcoming Christmas manis, also I need a red for stamping because almost all of the reds in my collection are jellies. I'm pretty positive I found exactly what I was looking for with Rapid Cherry, it's a very pigmented red creme that's just perfect! The application of this polish is great! I absolutely love Milani's wide, thick brushes- it makes coverage so easy. I probably could have gotten away with one coat of Rapid Cherry, since I was layering it, but I used two just in case. 


On top of Rapid Cherry is Spoiled Shuffle The Deck, which contains black, red, and silver hex glitters in a clear base. This polish immediately caught my eye as soon as I saw it! I was a little disappointed that the glitter didn't stick to the brush very well, but for $1.99, I can't really complain. The application of the polish was good but I did have to do a little glitter placement and fishing. I used 3 coats of Shuffle The Deck in my swatches. Other then the glitter not sticking to the brush all to well, I really like this glitter!! 


Excuse the glare in my pictures. It's been all overcast and rain today here so I had absolutely zero sunlight :( What do you think of Rapid Cherry and Shuffle The Deck? What do you think of the color combination? Let me know in the comments below! I appreciate and and all feedback!! And until next time, happy polishing!!! 

Saturday, November 3, 2012

Sally Hansen XW Lacey Lilac with stamp

I hope everyone had a good Halloween!! Ive been very busy working and finishing up my externship! I've only got 1/2 and hour to go. Yes. 1/2 an hour :/ ..which I'll be finishing up on Monday!! Woohoo!! And that also means in between looking for a job, I'll have much more time for posting yayy!! I'm looking very forward to saying goodbye to these 70-80 hour weeks and just having one, good paying job that I love!!

Anyways on to the nails!! This was my second mani using my MASH stamping plates. For this mani I used plate MASH-43. I painted each and every nail with Sally Hansen Xtreme Wear Lacey Lilac and used China Glaze Liquid Leather for the stamp!!


Direct Sunlight
Super simple. I absolutely love how this stamp turned out and I got lots of compliments for the day or two that I wore this mani. What do you think? Until next time, happy polishing!


Wednesday, October 31, 2012

Giants Nails


Yes I know, I'm a day late.. But I just had to post these in honor of the San Francisco Giants winning the World Series!

These nails turned out a little different then I had planned due to not having enough time. I had planned on doing the logo by using a zip lock baggy and then transferring it to my nails. But I just ended up free handing it on and I must say, I'm pretty proud of how it turned out, being the first thing I have ever free handed like that!

I used China Glaze Liquid Leather on my thumb (which you can't see here) and index finger and Sally Hansen Xtreme Wear Sun Kissed on my other three fingers. Then I just used a medium sized dotting tool to dot the polka dots over the Sun Kissed and I also used a smaller dotting tool to freehand the logo on. I tried using a brush, but the polish wasn't opaque enough and it would have been very light. I went over each nail with one coat of China Glaze Fairy Dust and topped them with Seche Vite, and there you have it!


I'm pretty happy with how they turned out, except for my index finger which I must have smudged up at some point in my sleep because it wasn't like that when I went to sleep :( :(  But other than that, I'm glad I decided to do this!


<div class="fb-like" data-href="http://www.facebook.com/ThatOneNailBlog" data-send="true" data-width="450" data-show-faces="true"></div>
Like us on Facebook!

Monday, October 29, 2012

Candy Corn Nails

With Halloween only a couple days away, I thought I should post my candy corn nails. I know that candy corn nails have been done a zillion times, but I think they're super cute and everyone just loved them when I wore them, so I thought I'd show you mine!

I started out with a white base. Once the white was completely dry, I taped off all of my nails except my ring finger from the bottom 1/3 of the way up and painted the non-taped portion with the yellow and removed the tape. When the yellow was 100% dry I taped my nail again from the bottom but this time 2/3 of the way up and painted the non-taped portion with the orange and afterwards removed the tape. Last but not least, I used a medium sized dotting tool and dotted on the polka dots on my ring finger and topped all of my nails with a coat of Seche Vite. Colors used were Essie Marshmallow (white), Sally Hansen Insta Dry Lightening (yellow), and Sally Hansen Xtreme Wear Sun Kissed (orange). 


Super simple, right?? It wasn't until I was inspecting my nails on my left hand after pulling the last piece of tape off that I noticed one of my lines on my index finger were crooked :( I really wanted to redo that finger but my best friend/editor of That One Nail Blog, Jennifer, kept insisting that I post my "oops" too. So here you have it. It drove me bonkers for the couple days I wore this mani. And not to point out all of my imperfections but also, the orange on my pinky bled a bit. Ohhh well I guess, I'll admit your right Jenn ;)


Sunday, October 7, 2012

Tape Mani

I can't believe how long it's been since I posted!  I have been extremely busy and finally finished school!!  Well, the school part of school and start the extern part tomorrow!!!!  Anyways...

Today, I have for you my first ever posted tape mani!!  I'm so OCD about perfectly straight lines, so of course I would love tape mani's!  I didn't really have any particular plan in mind when I started with my base color, Pure Ice Kiss Me Here but ended up doing sort of a triangular pattern on one side the upper part of my nail and painting it with Nina Ultra Pro Night.  After Night was dry, I simply taped off my nail right along the line of the black leaving just the unpainted portion of my upper nail and just painted it with China Glaze Turned Up Turquoise!!  Then, I just added a few dots of Night and Turned up Turquoise using a dotting tool and topped it with Seche Vite. 


I had a little shrinkage from the SV and a little bit of bleeding, but oh well- I think they didn't turn out too bad!  What do you think??


Tuesday, September 25, 2012

Loreal After Hours & SECHE VITE!!

Today, I have for you Loreal After Hours and my first ever top coat of Seche Vite!!  After Hours is a very dark blue that looks much, much darker on my nails then it did in the bottle.  I really like this color alot, but I'm not all to fond of the Loreal polishes formula.  I have 4 Loreal polishes and all of them are very thick!  I perfer my polishes on the thinner side and would rather do 4 coats of a thin polish than 2 of a thick polish, for me its just easier to work with.  But with that said, After Hours is very cremey, smooth, and looks great even without a top coat.  So, to sum it up- the formula of the Loreal polishes aren't on my top favorite list, although it is good polish.  


And!  I have some exciting news!!! I bought my first bottle of Seche Vite top coat!!  I was so super excited to use it!  So this is my first mani with SV top coat and I've got to say I absolutely LOVE LOVE LOVE it!!! It's so smooth and makes my nails look so much like they were done professionally in a salon!


If you don't already own a bottle of Seche Vite.. go buy some!!  Right now!!!  Sally's is currently having a sale- buy the top coat and get the base coat free and the total comes out to under $10.  So, go buy some!!  Until next time!  Happy polishing!!